The Misadventures of Spiky
Product Owner / Scripter / Sound Designer
About the Game
The Misadventures of Spiky is a 2.5D puzzle-adventure game with a focus on environmental storytelling. You play as the innocent hedgehog Spiky, peacefully tucked away in your pile of leaves. All of a sudden, you get thrown out of your home by a reckless camper with a rake! Devastated, you decide to set out on a dangerous journey through the forest, to find a new home…
On the way, you will run into all kinds of obstacles and challenges that you need to overcome. You will need to hide from danger, cross a heavily trafficked road, and much more, in order to reach your goal! Through your journey, you might also “accidentally” trigger one disaster after another creating panic and mayhem for the humans and the other animals. In the background a story will be told, so keep your eyes open on both the path and the background, what can you see that Spiky cannot?
Leave your worries behind and venture out to find a new home!
Specifications
Platform: PC
Engine: Unreal Engine 4
Development Time: 5 weeks
Team: 3 Designers, 4 3D Artists, 2 2D artist
Year: 2018
My Role
Before the project even started or we knew the groups I thought a lot about that I wanted to handle all the planning for the upcoming project. I stressed this out instantly to my team when we started. I took on the role as Product Owner I knew it would be quite a challenge but that I could handle it. As Product Owner, I was responsible for organizing tasks for the coming week and the backlog. I also organized meetings and made sure to book rooms for the meetings. To make it easier for my team members I made a Google Calendar for all of our meetings and deadlines. Another important part of the role was to prepare and perform weekly presentations for the Futuregames crew and for the jury. The presentations were something at first I was quite anxious about, but I got a lot of help from my team members preparing and practicing. I knew that for it to be good I had to practice every day, and in the end, it turned out very well.
The Product Owner role took a lot of my time but apart from that, I implemented an AI which was used for a fox in the game. It could patrol and chase the player. What I learned from this is that in the beginning, a difficult task might seem trivial and it’s up an running pretty fast, then after a while, the bugs and edge cases start showing up. For this task, it kept repeating almost the entire project. In hindsight, it was overscoping making such a sophisticated AI in such a short amount of time. Something that I remembered me about for our next project.
I also made all the sound design in the game. For that, I used FMOD which is an audio middleware engine. It was the first time I used it in a real project and I got a lot of experience using it and came to an understanding about the advantage and flexibility of using an audio middleware.
Post-mortem
This was my second project using Unreal Engine. Before starting the project I had no experience at all on how to implement an AI. During the project, I learned how to handle all the areas of AI, e.g. behavior trees, blackboards, and perception. I learned how to integrate an audio middleware engine to Unreal and thus separating the handling of audio to a software outside of Unreal. I also learned that by preparing for something as challenging as a presentation for around 100 people, well ahead, resulted in that I got so confident that I had no doubt it would go wrong.
What is an AI Behavior Tree?
Behavior Tree and Blackboard
In the game we have a fox that patrols in the background and will move to and attack the player if it sees the player. It will also react to certain noise. To make the fox work as intended I used an AI Behavior Tree.
A Behavior Tree is a blueprint which consists of branches and nodes. To make a Behavior Tree work a Blackboard is also needed. In the Blackboard, keys (similar to variables) are created to set and clear information that is used to determine which branches that shall be executed in the Behavior Tree at the moment.
Selector vs. Sequence
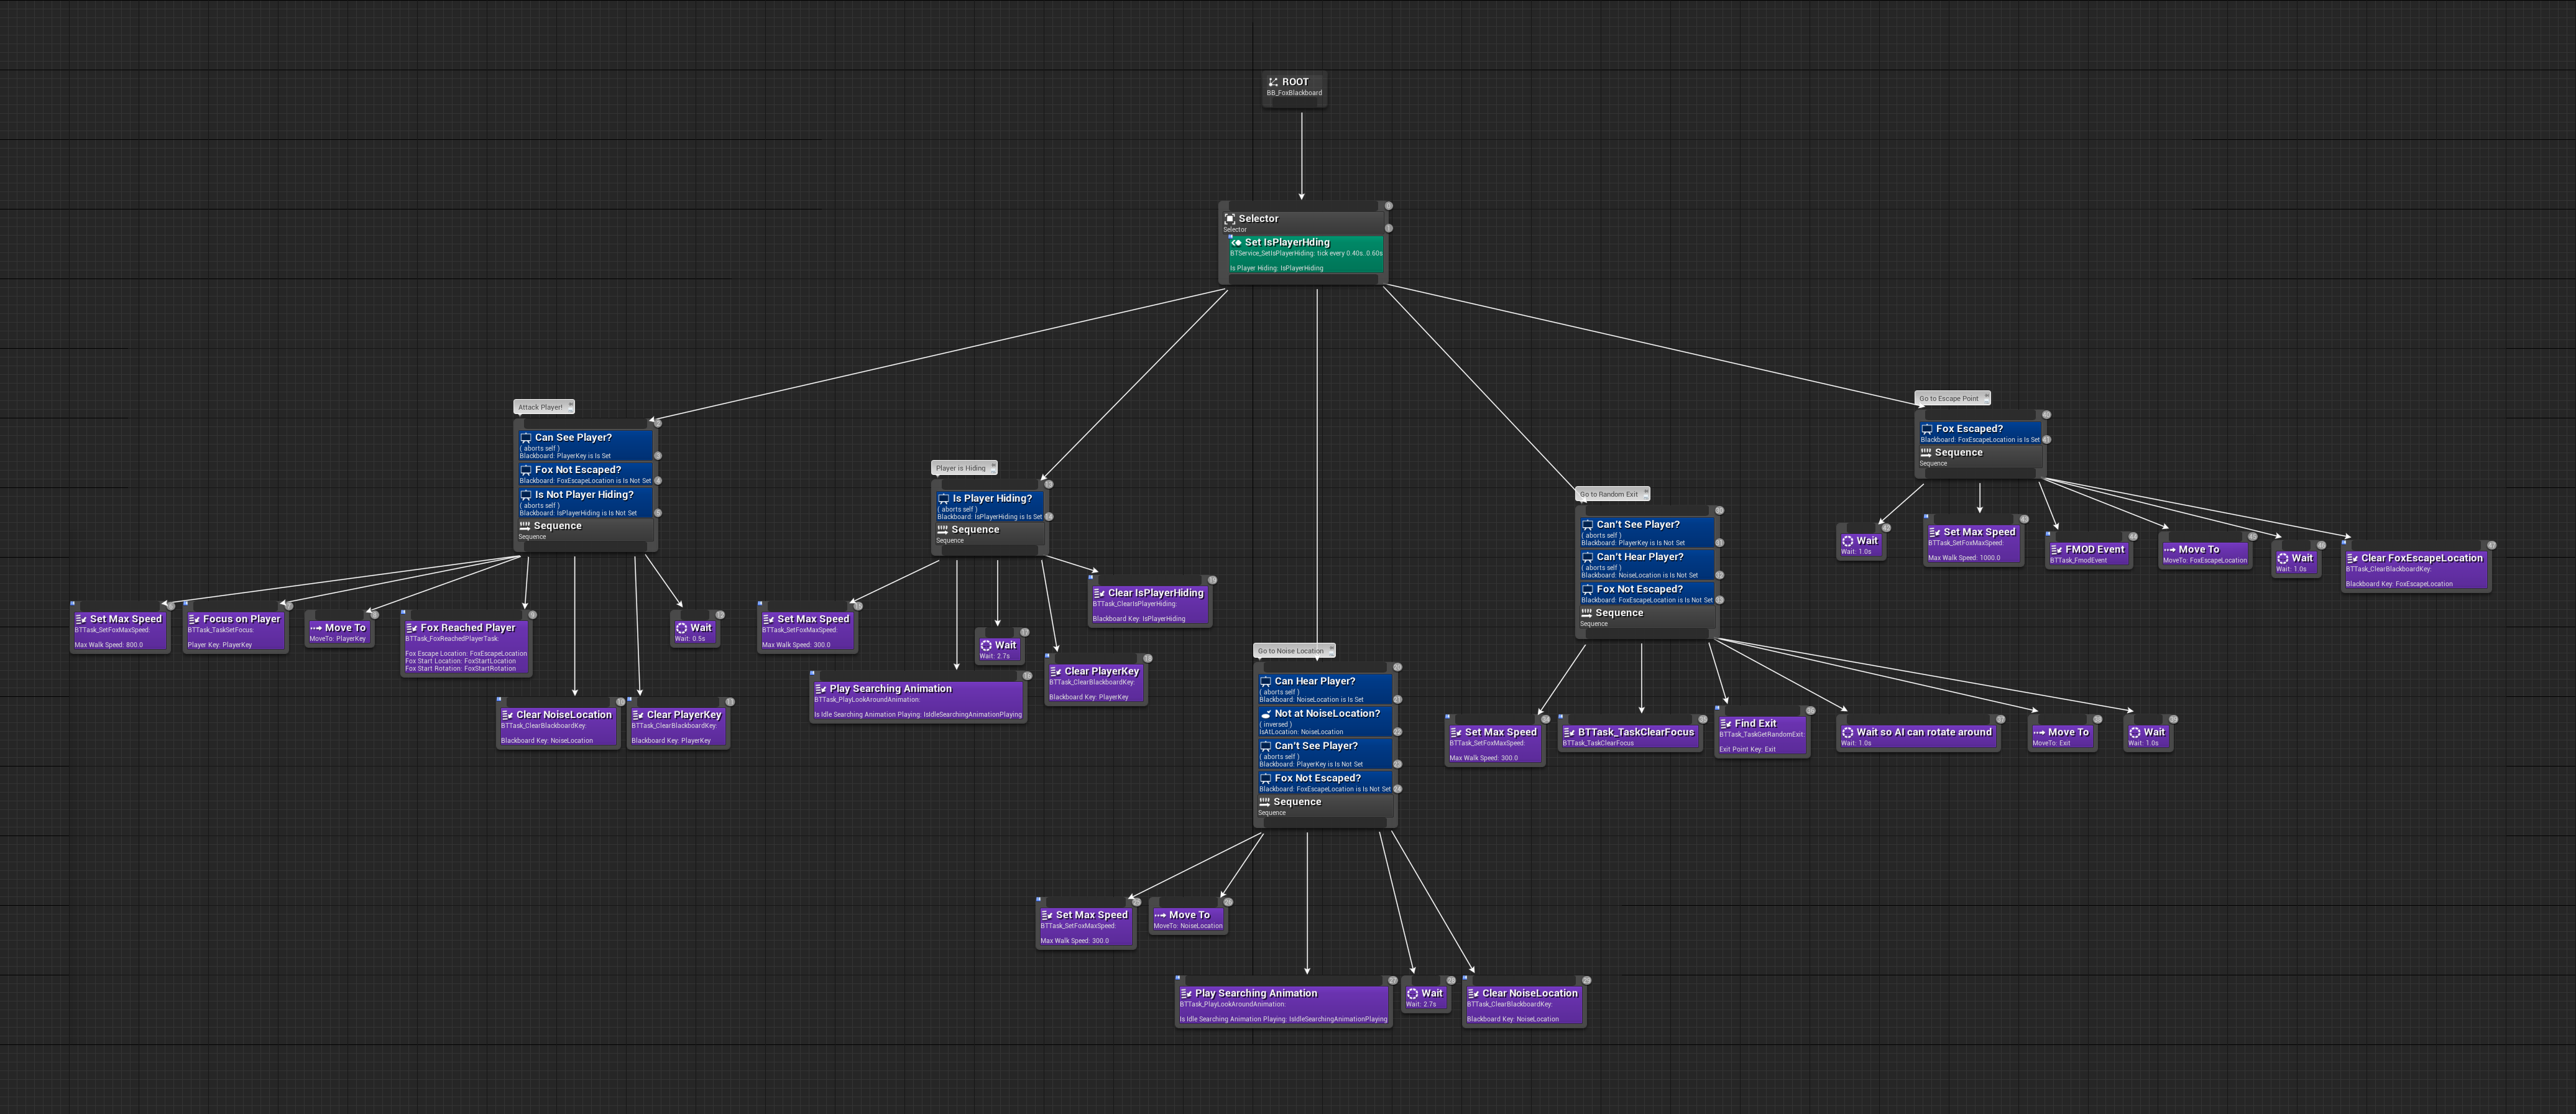
There are two primary nodes for the Behavior Tree. The Selector node will execute its children from left to right, when one of the children succeeds it will stop executing and traverse up the tree again. The other primary node Sequence will execute its children from left to right, but will stop executing immediately when one of the children fails. I use the Selector node at the top of my tree to make sure that only one branch of the tree is executed at the moment. I use Sequence nodes deeper in the tree so that multiple tasks can execute in a consecutive order.
Services, Decorators, and Tasks
There are three other important components that can be attached to a node: Services, Decorators, and Tasks. Services are used for example for setting a key in the Blackboard, it is run at a set interval, e.g. 0.4-0.6 seconds. The Service is composed in the same manner as a regular visual blueprint. I didn’t use Services that much because I found other ways to communicate with the Behavior Tree. Decorators works similar to if-statements, these can be attached to a node to determine if its children should be executed or not. On the Decorator you select which Blackboard key should be used as the condition. Tasks are nodes that will get fired if the Decorator conditions is met. There are a lot of built-in tasks, but I also made a lot of custom tasks to make the fox behave as intended. A Task is also composed as a regular visual blueprint.
AI Controller and AI Perception
In order to make an AI use a Behavior Tree the AI will need a custom AI Controller. On Begin Play in the controller you’ll need to add the node Run Behavior Tree and specify which Behavior Tree to run.
In the controller I also added an AI Perception component. This component can be configured to give the AI different senses. For this project, I used a sight sense, and a hearing sense.
Character and Nav Mesh
You will also need a Character blueprint and set its AI Controller Class to the AI Controller which runs the behavior tree. Finally, you will need a Nav Mesh Bounds Volume and place the character on it.
The Fox’s Behavior Tree
The Behavior Tree for the fox consists of 5 main nodes. I will go through them one-by-one below.
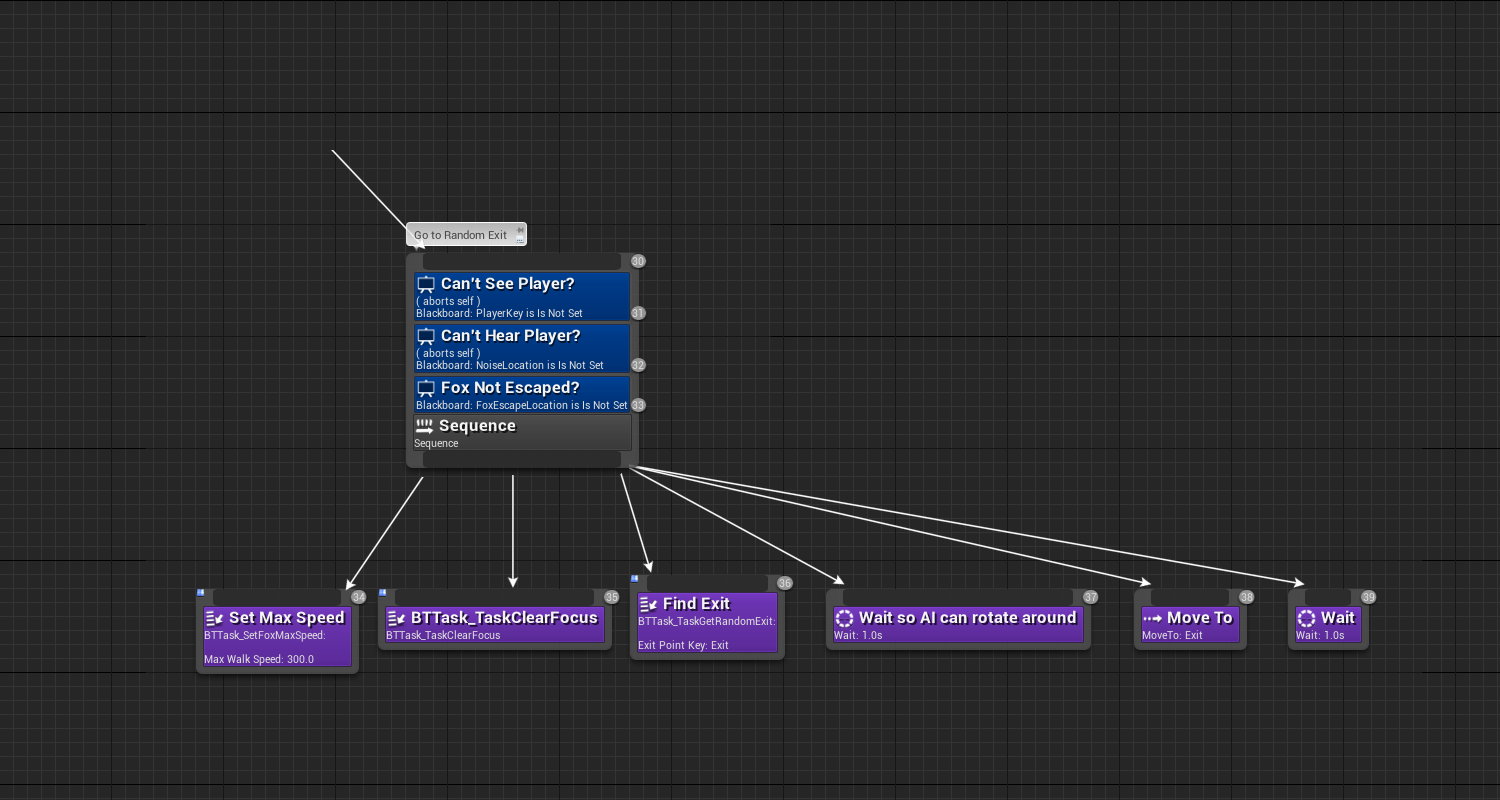
Go to Random Exit
On this node, I have three Decorators. The first one checks that the fox hasn’t spotted the player. The second one checks that the fox hasn’t heard a noise. The last one checks that the fox hasn’t entered the escape state. If all of these conditions are met the children will start to execute from left to right.
The first task is a custom task that I made, it sets the max speed of the Character component. The second task is also a custom task, it retrieves the AI Controller and clears the focus. This means that the character will stop rotating to a given point.
To make the AI patrol around the Nav Mesh I made an actor BP_AIExitPoint. Instances of this are placed along the Nav Mesh. The third task that is fired gets all exit points that are placed on the Nav Mesh and returns a random point. I also make sure that the task won’t return the point which the fox is currently on. Lastly, in the task, I set the Blackboard key “Exit” with the retrieved exit point. Finally, I use the built-in task Move To and set it to move to “Exit”. The Behavior Tree will continue to execute this task until the fox has reached its target.
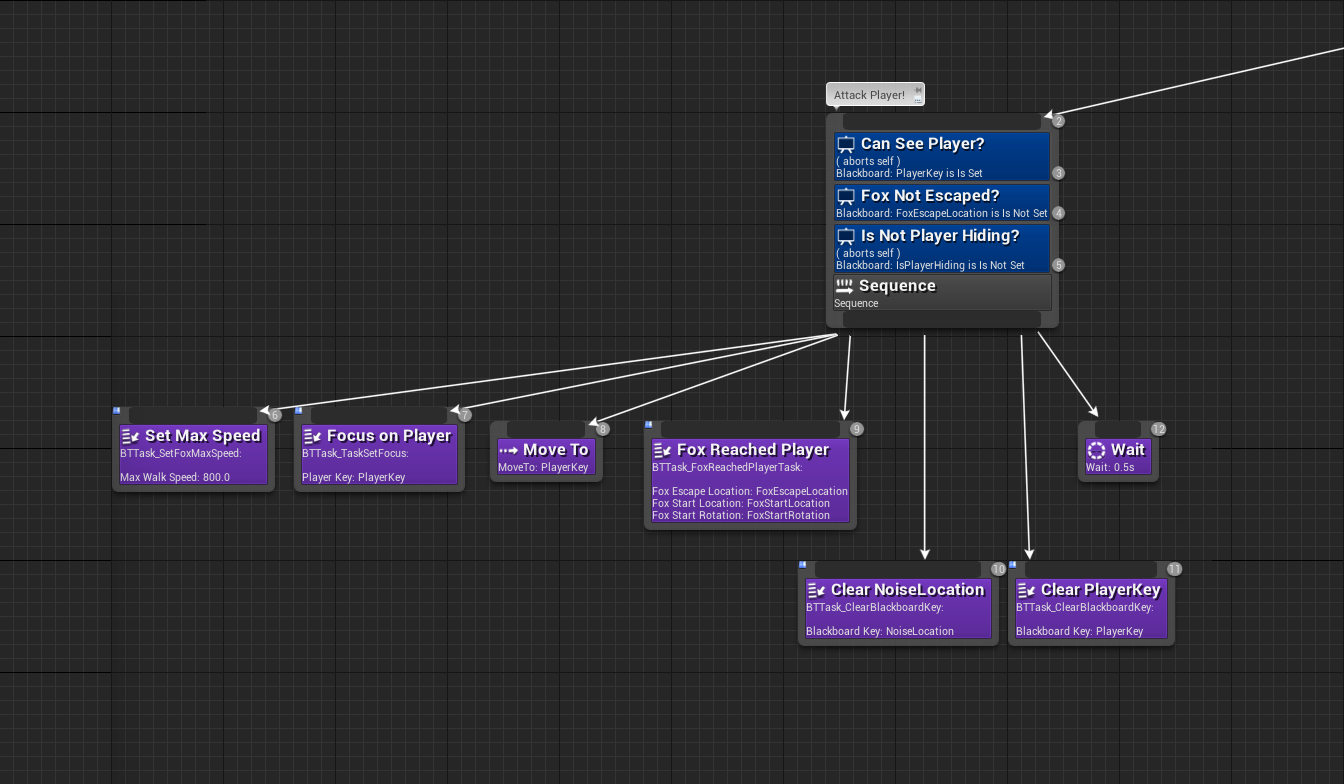
Attack Player
This node also has three decorators. The first one checks if the fox sees the player. The other two checks that the fox hasn’t escaped and that the player isn’t hiding. To know if the fox sees the player I override the event On Perception Updated in the AI Controller, this event belongs to the AI Perception component. In the event, I get the sensed stimuli and check if sight has been successfully sensed. If so, I set the player to a Blackboard key “PlayerKey”.
If the conditions are met I run tasks for increasing the max speed, set focus on the player so that the fox will rotate towards the player, and move to the player based on the “PlayerKey”. After this, I have another custom task which will kill the player when the fox has reached the player. Lastly, I made a custom task which will clear a specified Blackboard key, I use this to clear the “PlayerKey”.
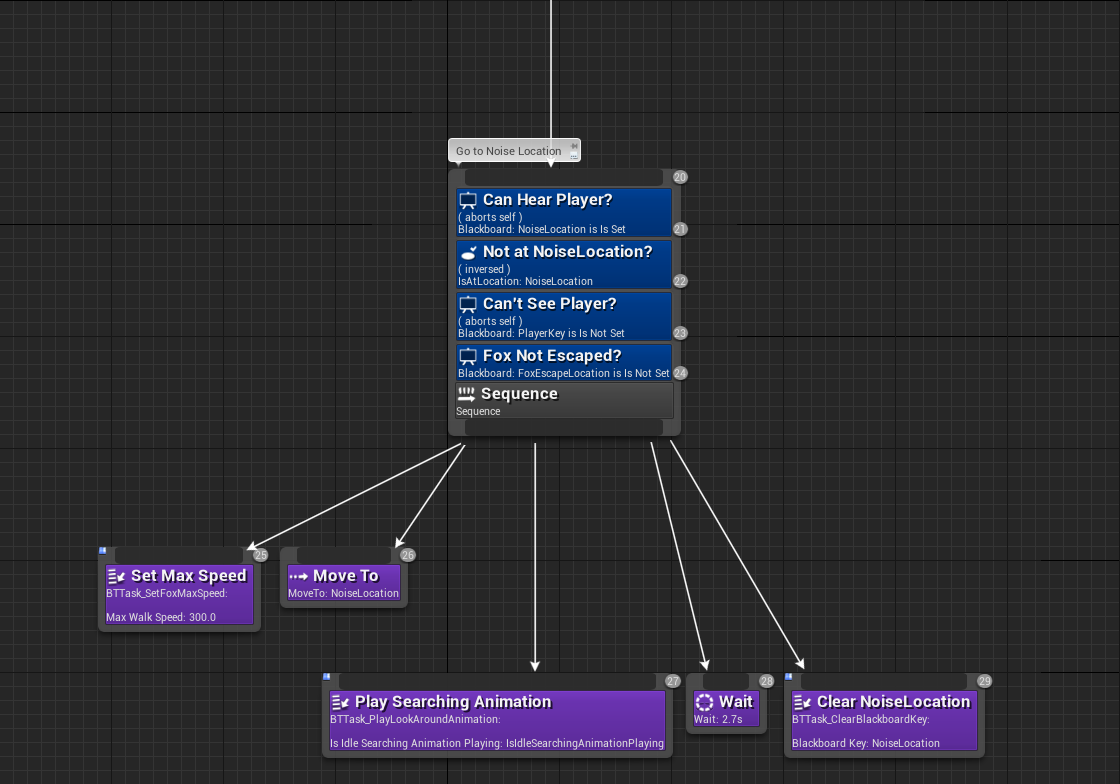
Go to Noise Location
The AI can also react to noise. In the game we have a blueprint, BP_LeavesOnGround, when the player goes to fast over it it will emit noise. When the player enters the trigger a call is made to Pawn Make Noise. The loudness of the noise is calculated based on the player’s current speed normalized, i.e. a value between 0 and 1, where 1 is the max speed. So if the player walks very slowly the fox won’t react to the noise. In On Perception Updated I then check if the fox has heard any noise. If so, the fox will start to move to the leaves, not to the player. This gives the player an opportunity to be able to reach safety. When the fox reaches the leaves I have another custom task that communicates with the fox’s animation blueprint to play another animation where the fox starts sniffing. The fox will wait for a while at the leaves, if the player is spotted it will abort and go into attack mode. Otherwise, it will go back to patrolling when it has finished sniffing.
Player is Hiding
This function was implemented but we decided not to use it in the game because it was late in development and we didn’t find the time to test it thoroughly. But basically, we had a blueprint with a bush, if the player was inside the bush the fox lost his sight of the player and if the player waited long enough the fox would forget the player. To make this work I did a new Object Channel in Project Settings called “FoxAI”. On the character for the fox, I made sure its collision object type was “FoxAI”. On the bush, I then configured the collision preset to make sure that only the player could go through the bush, and that it would block the fox.
Go to Escape Point
We used this feature early in conjunction with that the player could roll into a ball. If the player was a ball when the fox attacked, the fox would get scared and run away to an escape point. But after some playtesting, we concluded that it felt more intense to remove this feature. I made a custom task for this that would play an FMOD Event at the moment the fox got scared. FMOD is an audio middleware engine and has an application FMOD Studio which is separated from Unreal Engine. In FMOD Studio you build events based on one or multiple audio files which are then exported to Unreal Engine.
FMOD
FMOD is an audio middleware engine. To use FMOD with Unreal Engine you need two things: FMOD Studio and FMOD UE4 integration. FMOD Studio is similar to a DAW (Digital Audio Workstation) and has a built-in mixer, and features for automating and modulating sounds, e.g. pitch and volume. In FMOD a sound effect is called an Event, and it can contain one or more channels.
Making a Sound Effect Dynamic
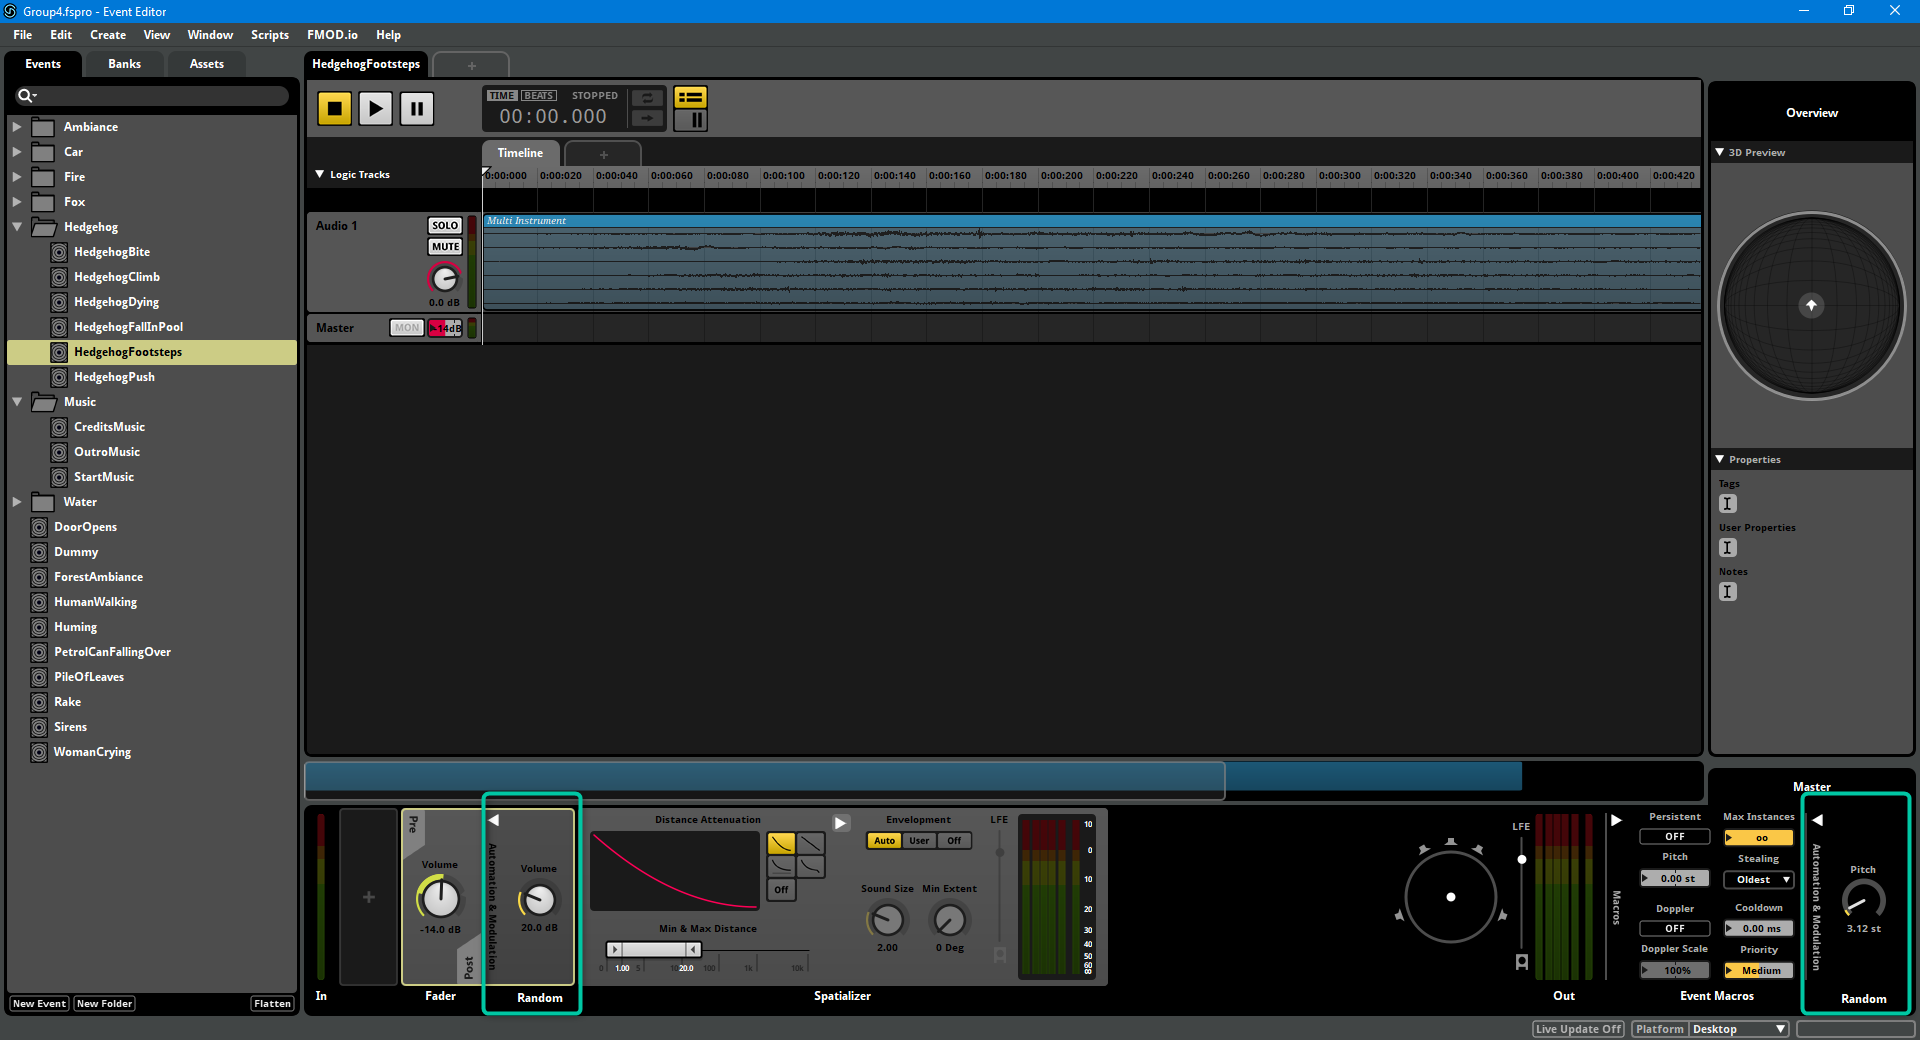
To not make the footsteps of the hedgehog sound too repetitive I use more than one source sound, on playback one of the sounds is played randomly. This is easily done in FMOD by dragging and dropping multiple source files from the Audio Bin onto an Audio Track.
Another way of making a sound effect more dynamic is by using a random modulator. Two common uses of this are to modulate the volume and the pitch. In the image below I have applied modulation to both the volume and the pitch.
If we look at the volume, the yellow area on the circle indicates a range, on each playback a randomly selected value will be chosen from this range and applied to the volume. This means that the sound will sound more dynamic each time it’s played. It’s the same formula for the pitch.
Game Parameters
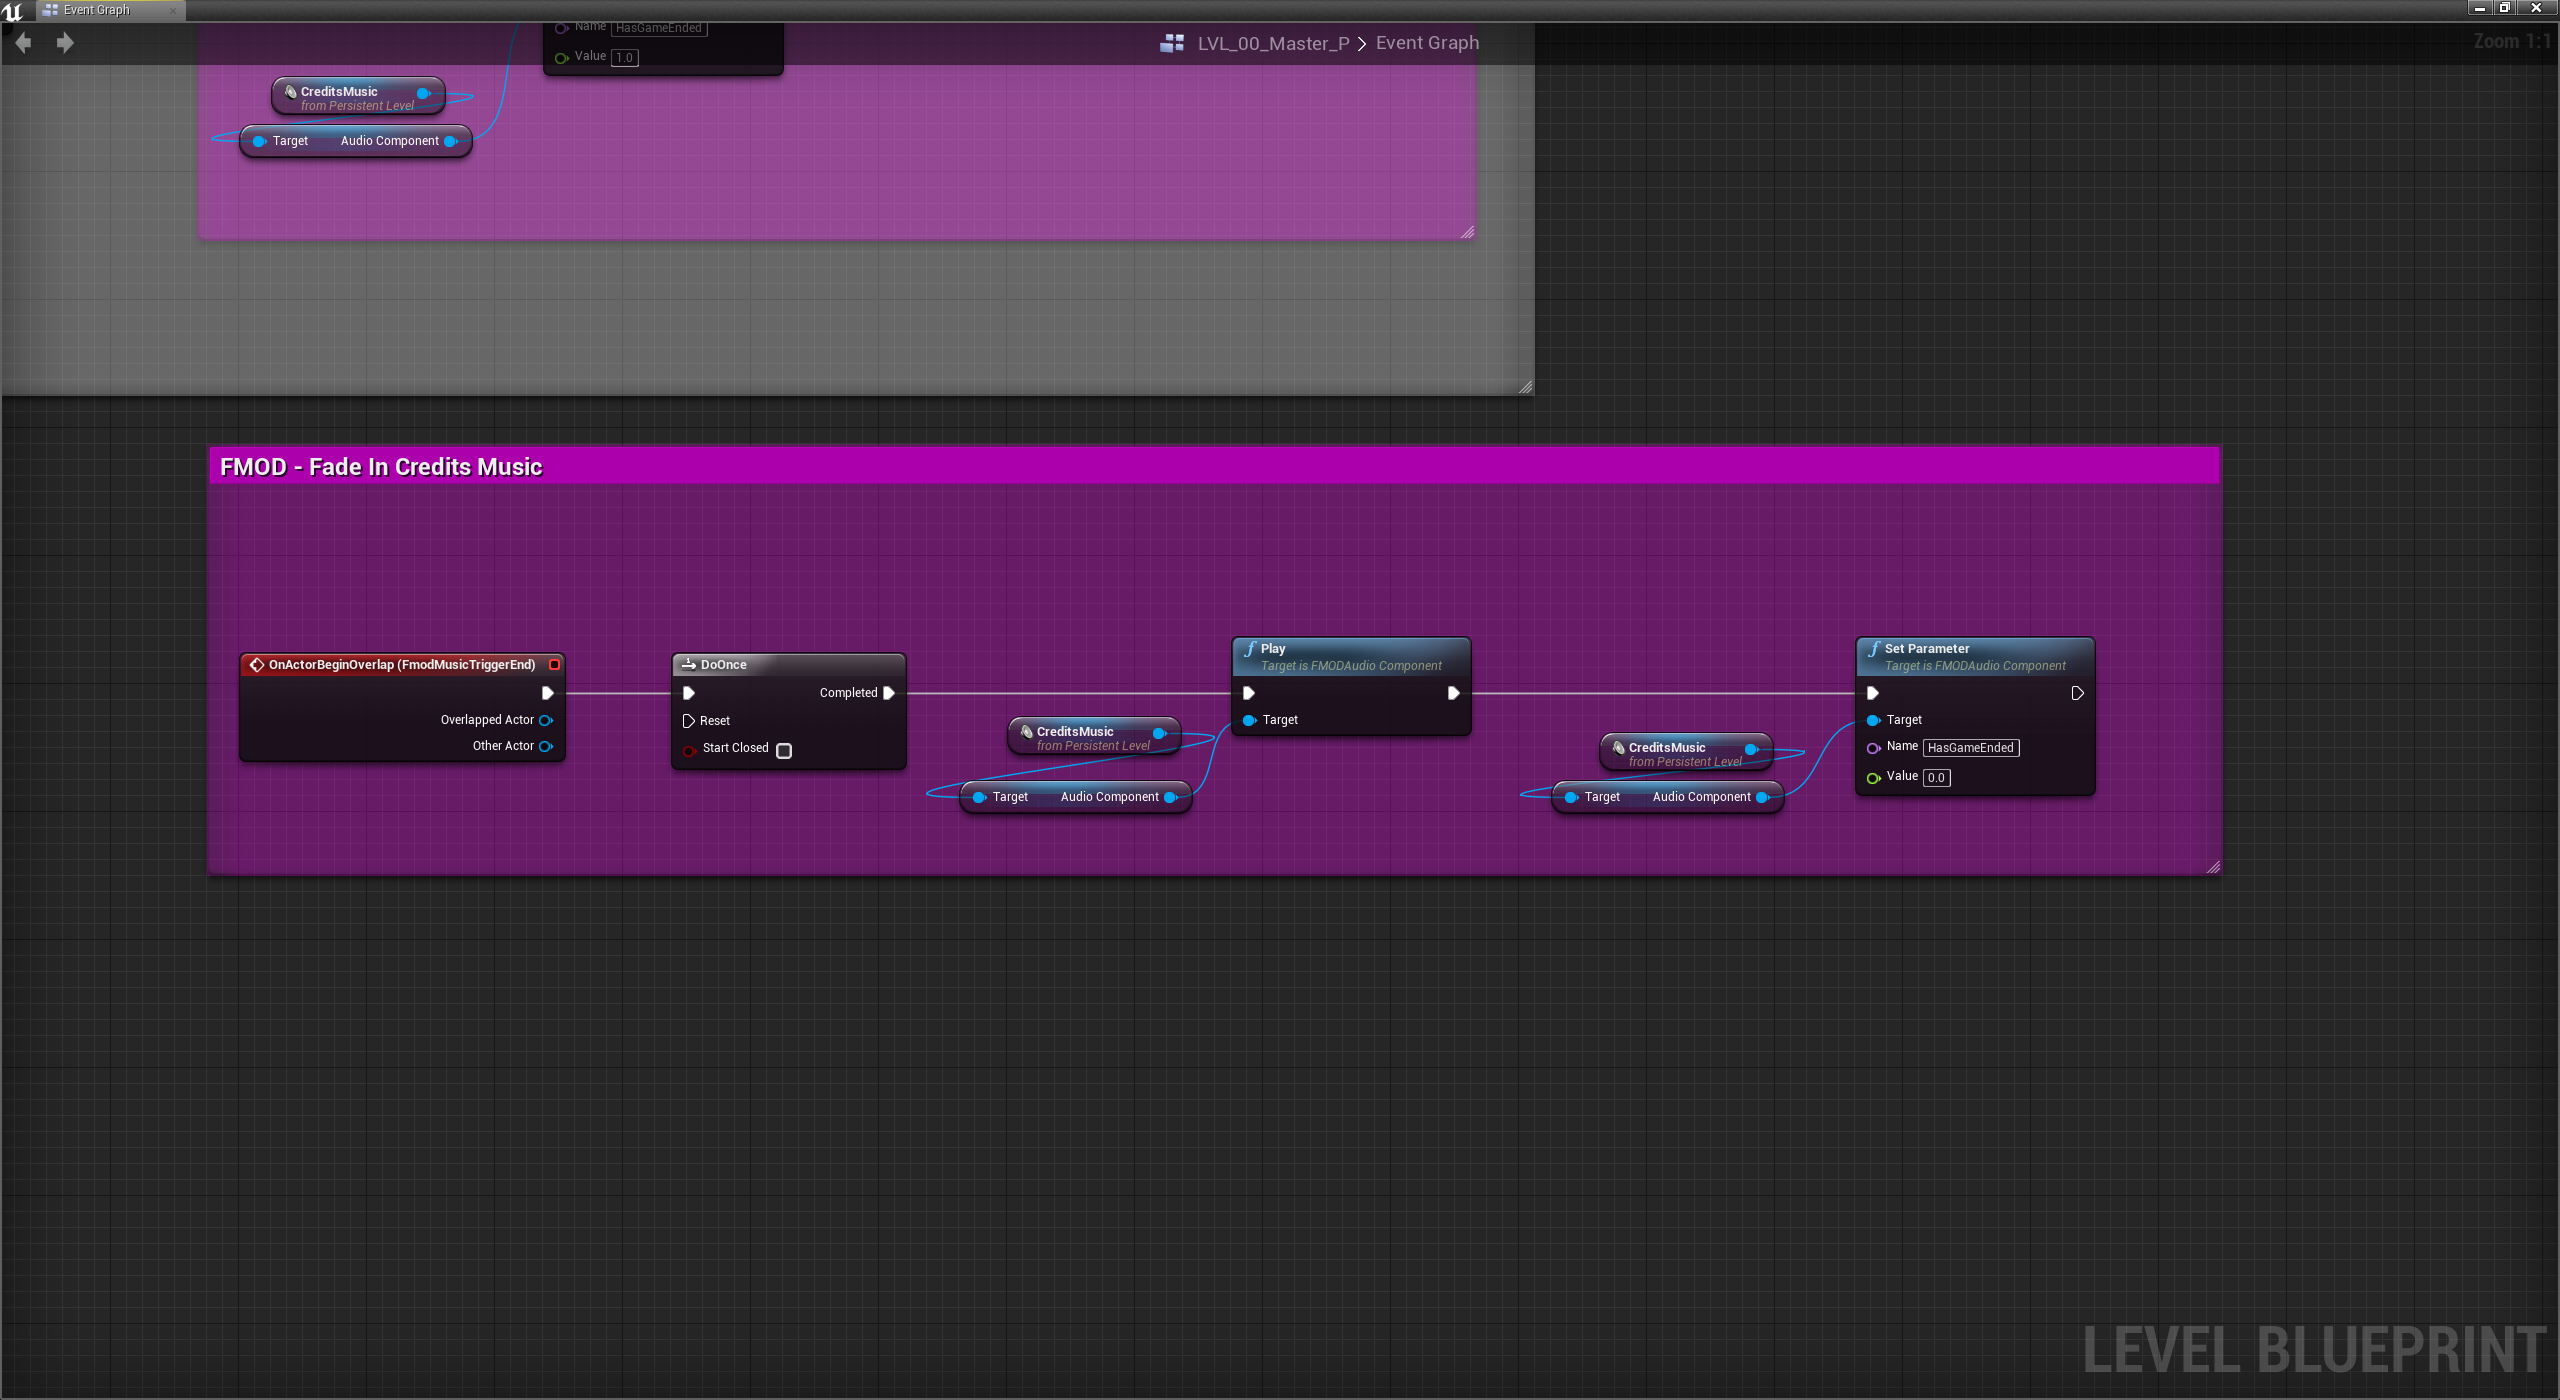
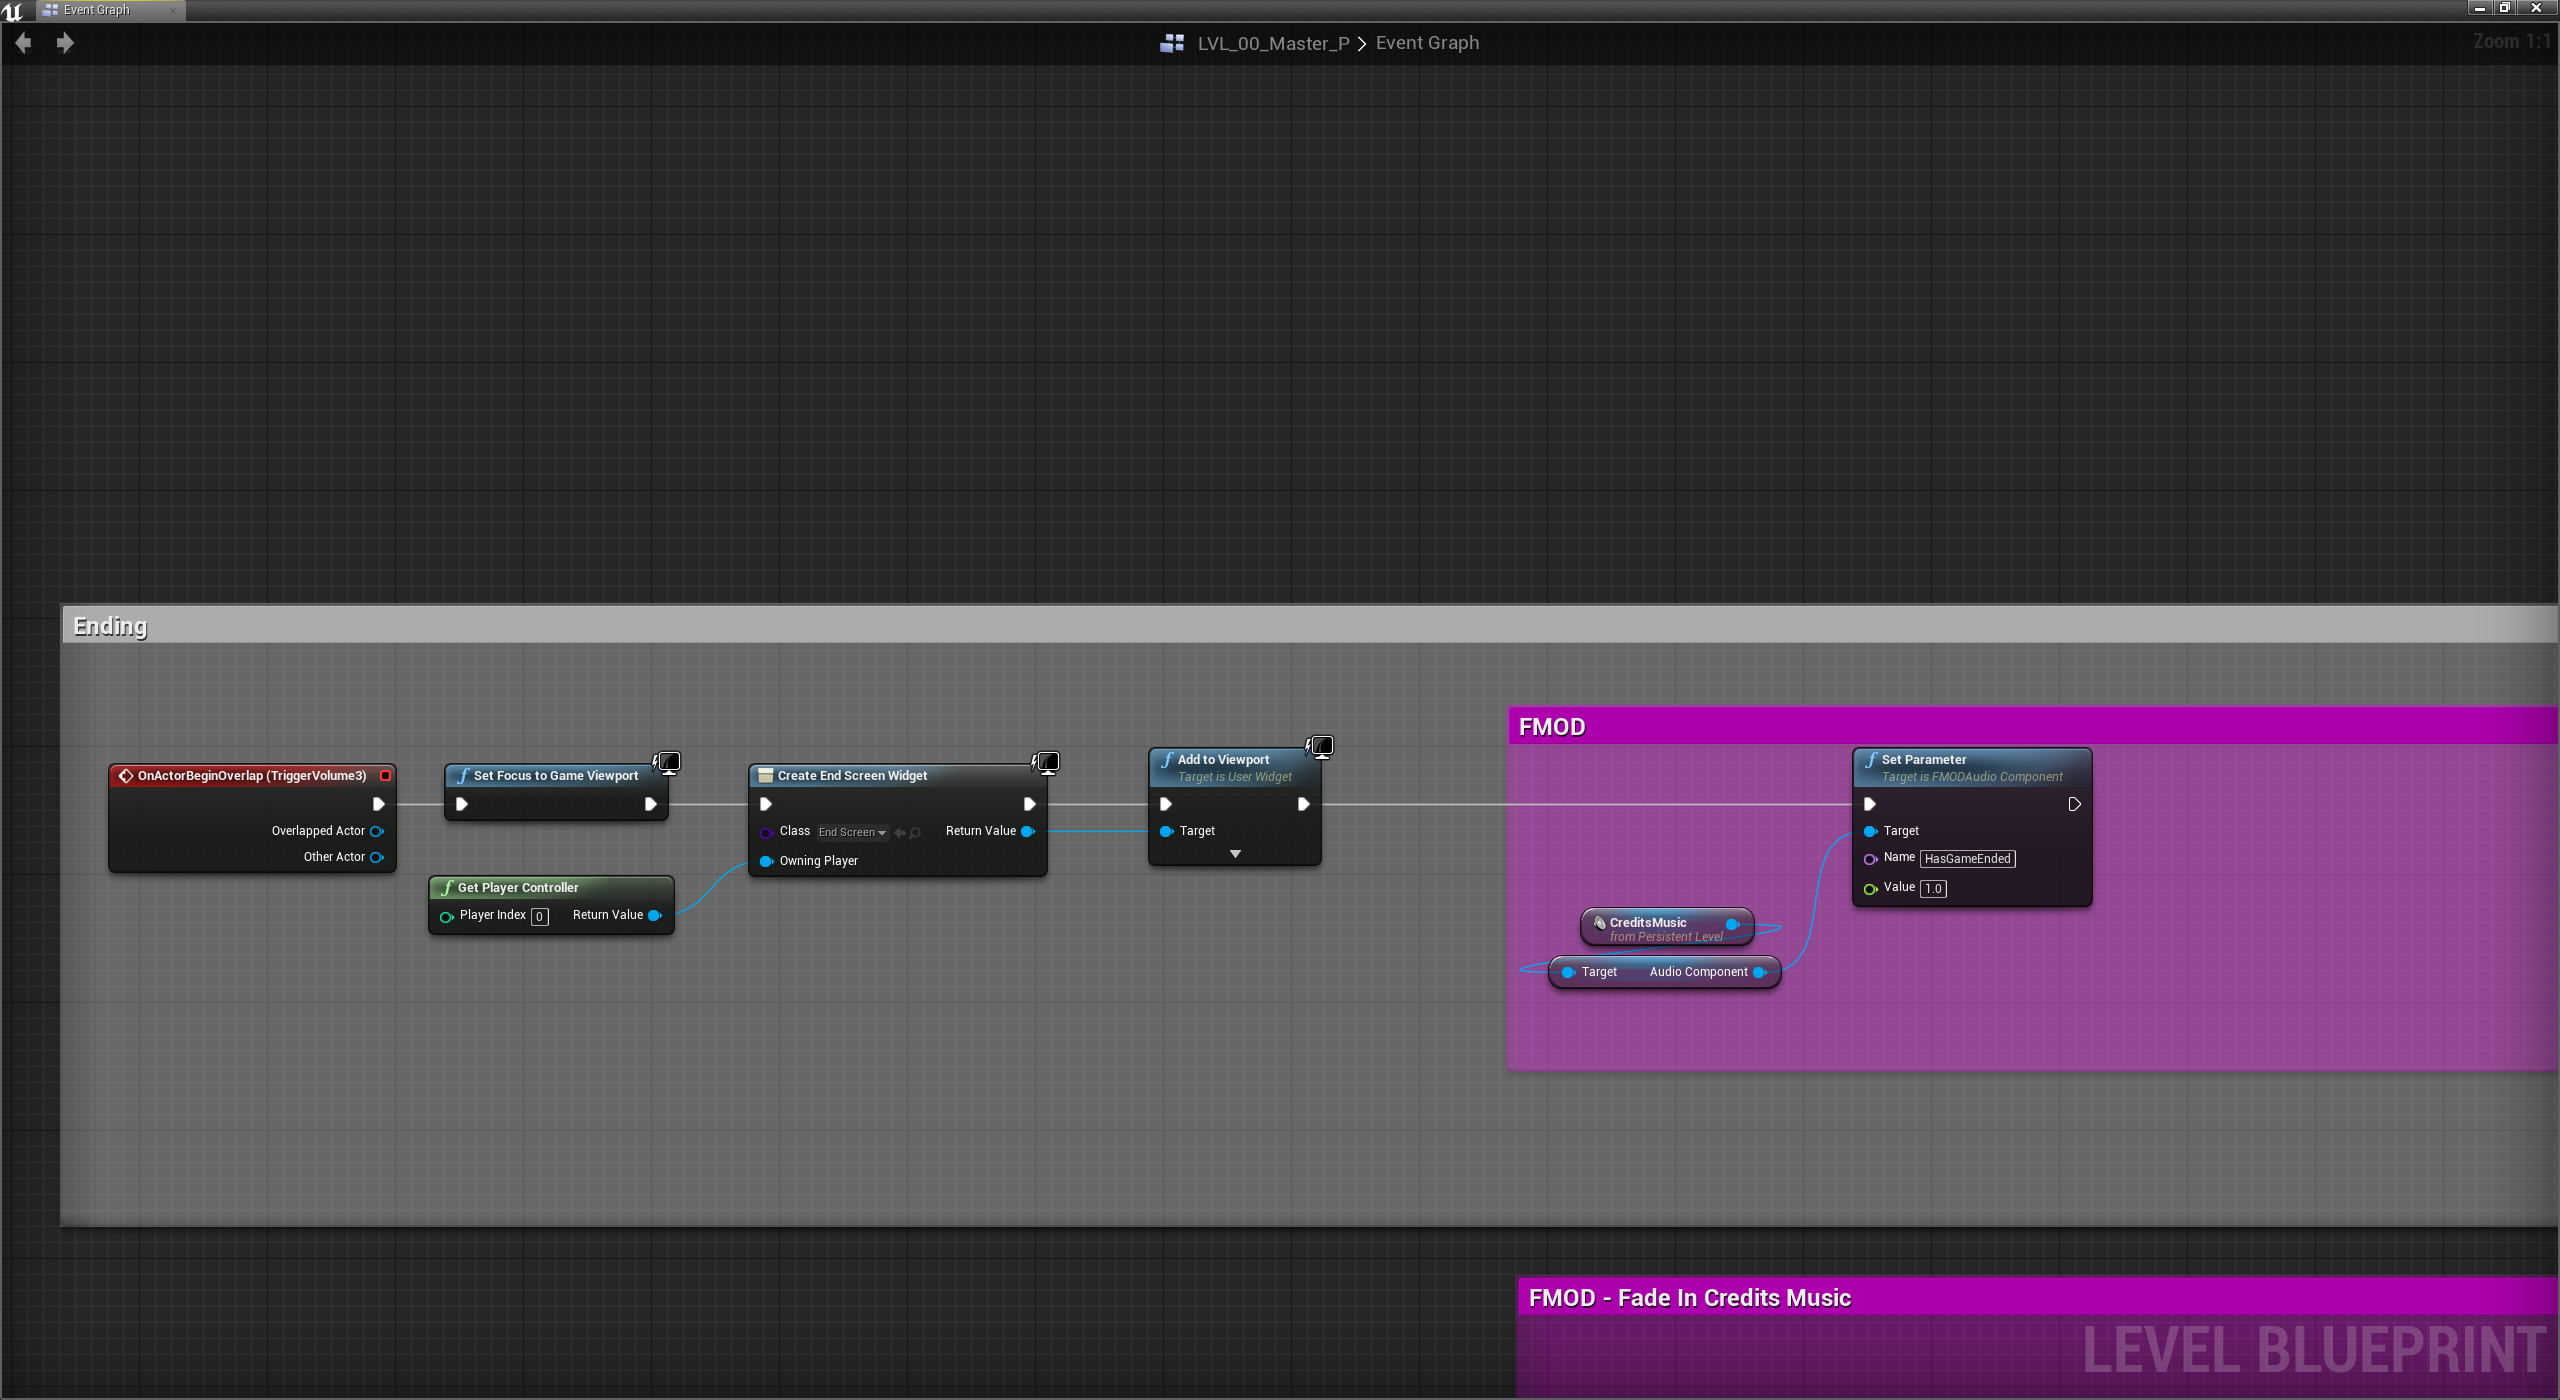
What really makes FMOD interesting is the ability to automate events based on parameters that are passed in from the game. One of the parameters that I made for the game is called “HasGameEnded”, this parameter is used to determine if the player has reached the end of the game and if so the credits music should start playing. To set a parameter’s value in Unreal Engine you use the node “Set Parameter”, and type the name of the parameter and enter the new value. In the image below this event starts to play if the player walks into the trigger box.
Loop Regions and Markers
I want to mention some other things you can do in FMOD. The following image shows the event for “CreditsMusic”. It consists of two parts. The first one is played when the player walks into the first trigger box, which is near the end of the game. When that happens “HasGameEnded” parameter will be set to 0 and the event will start playing from the beginning. This section has a Loop Region, which is indicated by the blue bar above it. When the time marker reaches the end of the loop region it will jump back to the beginning of the loop region. It also has Transition Markers, these are indicated by the green bars and lines. A Transition Marker consists of an action and a condition. The action, in this case, is that it should jump to a Destination Marker called “Credits Start”, but only if the condition is met. The condition for this will be true if “HasGameEnded” equals 1. So unless it’s 1 it will continue to loop.
When the player reaches the trigger box at the end of the game I set “HasGameEnded” to 1 and as soon as the music reaches the next Transition Marker line it will immediately jump to the destination marker and the credits music accompanied with drums will start to play.


